[Working] How to install WordPress on Ubuntu 20.04 Linux | Azure VM
In this blog, we are going to install WordPress on Ubuntu Linux Apache server running on Azure Virtual Machine.
Here is how we are going to do this:
- Create an Ubuntu Virtual Machine
- Connect to Ubuntu Server using SSH
- Install Apache2 HTTP server
- MySQL Installation and Configuration
- Install PHP and Related Modules
- Create the WordPress Database
- Download and Install WordPress
Introduction
WordPress is one of the world’s most popular web publishing platforms for building blogs and websites. From blogging to e-commerce to business and portfolio websites, WordPress is a versatile CMS. Designed with usability and flexibility in mind, WordPress is a great solution for both large and small websites.
There are different ways of hosting a WordPress site on Microsoft Azure. In this blog, we are going to install WordPress in Ubuntu 20.04 server using LAMP stack. This guide will also work on Ubuntu Server 18.04 LTS.
Install WordPress website on Azure using Bitnami Stack
Step 1: Create an Ubuntu Virtual Machine
First login to your Azure Portal and Create a Virtual Machine.
We can just click on Virtual Machine or search for Virtual Machine on Top Search Bar and click on Create.
After that, fill out some basic information. Choose your Subscription and resource group. Create a new resource group if you don’t have any. Then your Virtual Machine name and Region.
For Image, we will choose Ubuntu Server 20.04 LTS – Gen 1 and choose the size as per the requirement.

Under Administrator account, select SSH public key.
In Username type the username you want.
For SSH public key source, leave it default, and then type the key name for the Key pair name.
Under the Public inbound ports, choose Allow selected ports and then select SSH (22) and HTTP (80) from the drop-down.

Leaving everything else as defaults, click on Review + create. If it is still asking for some details, fill that and hit Create.
A new popup will show up and select Download private key and create resource. The key file will be downloaded as thekeyname.pem.
Once it is deployed, Go to the resource and note the Public IP address.
Microsoft Docs: Create a Linux virtual machine in the Azure portal
Step 2: Connect to Ubuntu Server using SSH
Create SSH connection with VM
Once the resource is deployed, click on Connect and select SSH.

There we get the instructions for connection.
Open the client of your choice. I am on my Windows machine at the time of creating this tutorial and using Git Bash.
Now, go to the path where you had downloaded the key file.
Here we need to ensure we have read-only access to the private key.
chmod 400 thekeyname.pemSo, run the command to connect to the VM.
“ssh -i <private key path> azureusername@thePublicIPAddress”
For example, in my case:
ssh -i thekeyname.pem username@52.183.89.27Enter ‘yes’ and we should now be connected to our Ubuntu Server.
Microsoft Docs: Connect to a Virtual Machine
Step 3: Install Apache2 HTTP Server
We are using Apache2 HTTP server, and to install it, run the following command:
sudo apt update

sudo apt install apache2
Enter the following command to ensure that Apache2 Service starts automatically after a reboot.
sudo systemctl stop apache2.service

sudo systemctl start apache2.service

sudo systemctl enable apache2.service
Now, its been installed, lets check if the web server is working or not.
Go to the browser and visit the public IP address. In my case it is: 52.183.89.27
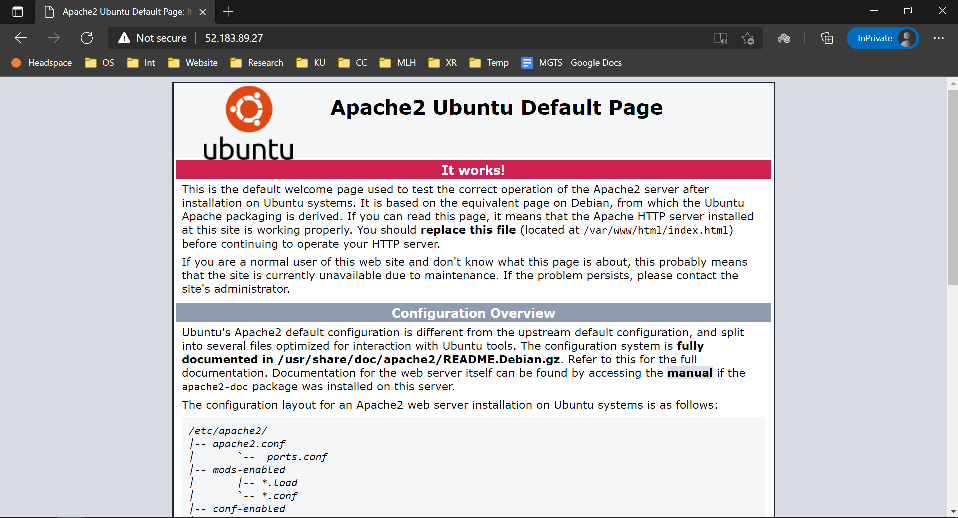
If there is a page like above, mission passed.
Step 4: Install and Configure MySQL
Install MySQL in Ubuntu 20.04
WordPress requires a database to store its contents. We are using MySQL for it and to install the MySQL database server, run the following command:
sudo apt install mysql-serverSecondly, enter the following command to ensure that MySQL Service starts automatically after a reboot.
sudo systemctl stop mysql.service

sudo systemctl start mysql.service

sudo systemctl enable mysql.service
MySQL Configuration
Now, to perform a secure install for MySQL, lets configure the security options by executing the following command:
sudo mysql_secure_installationEnter the following settings:
Enter current password for root (enter for none): Just press the Enter
Set root password? [Y/n]: Y
New password: Enter password
Re-enter new password: Repeat password
Remove anonymous users? [Y/n]: Y
Disallow root login remotely? [Y/n]: Y
Remove test database and access to it? [Y/n]: Y
Reload privilege tables now? [Y/n]: Y
So, to test if the setup is successful, enter the following command:
sudo mysql -u root -p Enter your password, and it should login you to the mysql console.
Here, we can type ‘exit’ to exit out of the session.
How to Install MongoDB on Arch Linux
Step 5: Install PHP and Related Modules
Install PHP in Ubuntu 20.04
Run the following command to install PHP and related modules:
sudo apt install php php-mysql php-cgi php-cli php-gdsudo systemctl restart apache2To restart the Apache2 server.
Step 6: Create the WordPress Database
Login to MySQL and enter your password:
sudo mysql -u root -p Then create the database wordpressdb:
CREATE DATABASE wordpressdb;
SHOW databases;
After that, create a database user, wpuser with new password.
See Is your password weak? And Why you should Not use a Weak Password.
CREATE USER 'wpuser'@'%' IDENTIFIED BY 'your_password_here';Grant the user full access to the database.
GRANT ALL PRIVILEGES on wordpressdb.* to "wpuser"@"%";FLUSH PRIVILEGES;Step 7: Download and Install WordPress
Install WordPress on Ubuntu
In order to get the latest release of WordPress, go to its official download page and get the download link.
wget https://wordpress.org/latest.zip
It should download the latest WordPress release zip file.
Install unzip and unzip the file.
sudo apt install unzip

unzip latest.zip
Now, we will copy all its content to the new directory, where we need to keep the contents of the website.
cd wordpress

sudo cp -r * /var/www/html/
After that, set the correct permissions for WordPress directory files.
cd /var/www/html/

sudo chown -R www-data:www-data /var/www/html/

sudo chmod -R 755 /var/www/html/
And, we need to delete the default index.html file.
sudo rm -rf index.htmlNow, if we visit our Public IP Address, which is 52.183.89.27 for me, then we can see the WordPress Installation page.
Install WordPress on Apache
Now, it is just the normal WordPress Installation.
Use the database name, username and password as we had created before. For me, the setup would be:
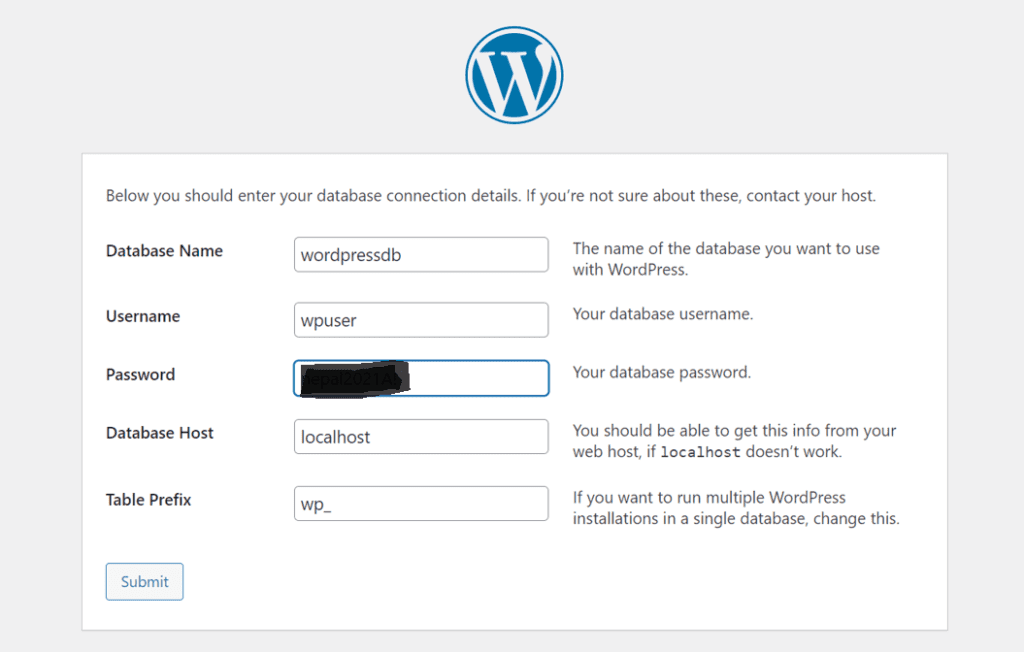
Now, visit Public IP address again, there should be your WordPress Site.
In this way, we can install WordPress on Ubuntu 20.04 LTS on Apache server running on Azure Virtual Machine.
Also, see Host WordPress website on Azure and Connect to Custom Domain
If this was helpful, how about buying me a coffee ?


Great Work
Hello, I enjoy reading through your article. I wanted to write a little comment to support you.