How to Build a Secure and Advanced Auth System in AWS Amplify with OAuth & Federated Identities

Introduction
Imagine signing into an app and instantly accessing personalized content—no repeated logins, no security headaches. Now, imagine doing this securely across multiple platforms while integrating Google, Facebook, or Okta as authentication providers.
That’s exactly what AWS Amplify + Cognito enables, but basic auth flows aren’t enough when dealing with enterprise-grade security, multi-tenant apps, and real-world scalability.
Whether you’re building a React web app, a React Native mobile app, or a hybrid solution, you need more than just “Sign in with Google”—you need:
- Custom OAuth providers (Google, Facebook, Okta, Microsoft)
- Federated identities for seamless cross-platform authentication
- Secure token management to prevent unauthorized access
In this guide, we’ll go beyond the basics, diving deep into Cognito’s advanced authentication capabilities, setting up OAuth & federated identities, and ensuring top-notch security for your authentication flows.
By the end of this tutorial, you’ll have a robust authentication system in AWS Amplify that not only improves user experience but also meets modern security standards. So, let’s get started!

Understanding Authentication & Authorization in AWS Amplify
Authentication vs. Authorization – What’s the Difference?
Before diving into AWS Amplify’s authentication system, it’s crucial to understand two often-confused terms:
- Authentication = Who you are (verifying user identity)
- Authorization = What you can access (determining permissions)
For example, when logging into Netflix, your email & password verify who you are (authentication), but whether you can watch 4K content or just HD depends on your subscription level (authorization).
A robust system needs to ensure users not only log in securely but also access only what they are permitted to.
How AWS Amplify Handles Authentication?
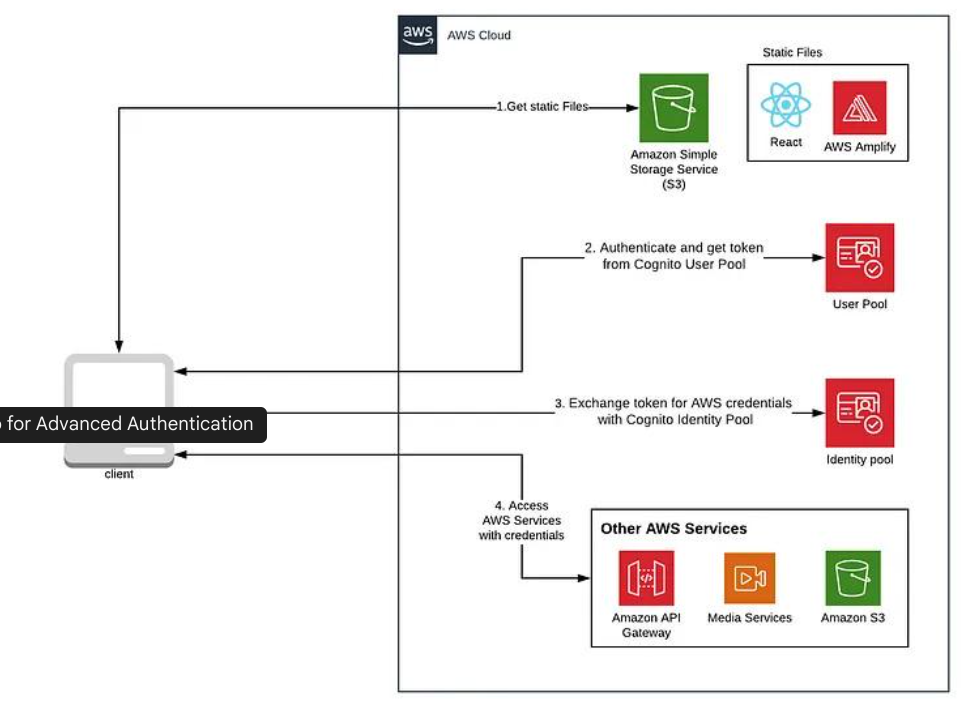
AWS Amplify simplifies authentication with Amazon Cognito, a managed identity service that eliminates manual backend work for developers. Here’s how it works:
Cognito User Pools → Handles user sign-ups, sign-ins, and multi-factor authentication (MFA).
Cognito Identity Pools → Grants users access to AWS resources (S3, DynamoDB, API Gateway, etc.).
AWS Amplify Auth → Provides an easy way to integrate authentication into React, React Native, and Expo apps.
User Pools vs. Identity Pools – When to Use What?
| Feature | Cognito User Pool | Cognito Identity Pool |
| Purpose | Authenticates users (sign-in, sign-up) | Grants access to AWS services |
| User Management | Yes (email, phone, social login) | No |
| Federation (Google, Facebook, etc.) | Yes | Yes |
| IAM Role Assignment | No | Yes (fine-grained access control) |
Real-World Use Case
- If you’re building an app and need to manage users who log in with email, Google, or Facebook, use User Pools.
- If you want authenticated users to access AWS services (S3, Lambda, etc.), use Identity Pools.
Why This Matters?
- Without User Pools, there’s no authentication—anyone could access your app.
- Without Identity Pools, users can log in but can’t interact with AWS resources securely.
- Combining both creates a secure and scalable authentication system.
Next Up: We’ll set up Cognito User Pools & Identity Pools step by step!
Setting Up Cognito for Advanced Authentication
Now that we understand how authentication works in AWS Amplify, let’s get hands-on and configure Cognito User Pools, Identity Pools, and secure token management for a production-ready authentication system.
i) Creating a Cognito User Pool
A Cognito User Pool acts as a user directory where users can sign up, sign in, and manage their accounts. Let’s create one.
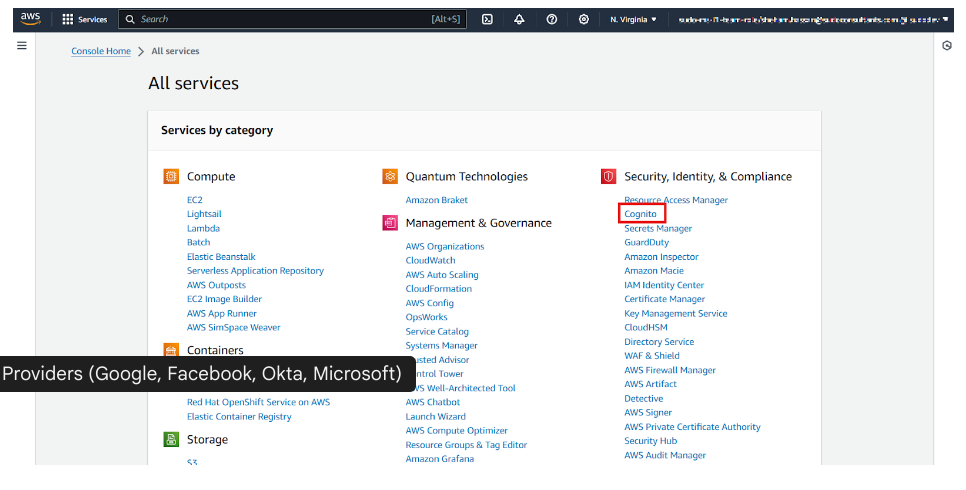
Step 1: Create a New User Pool
- Go to the AWS Cognito Console → Click “Create a user pool.”
- Enter a Pool name (e.g., MyAppUserPool).
- Choose “Email” as the primary sign-in method.
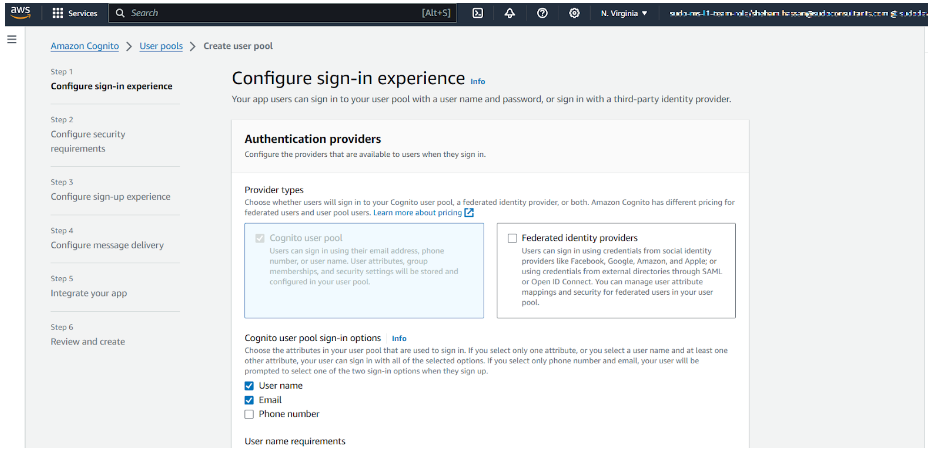
Step 2: Enable OAuth Providers (Google, Facebook, Okta, Microsoft)
To allow users to sign in with Google, Facebook, Okta, or Microsoft, follow these steps:
- In the “Federation” section, select “Identity providers”.
- Choose Google, Facebook, Okta, or Microsoft and enter the required client ID & secret.
- Then, configure callback URLs (e.g., https://myapp.com/callback).
Step 3: Enable Multi-Factor Authentication (MFA) & Strong Password Policies
To enhance security, enable MFA and set strong password policies:
- Enable MFA (via SMS or authenticator apps).
- Set password rules (minimum length, uppercase, special characters).
- Allow account recovery using email or phone number.
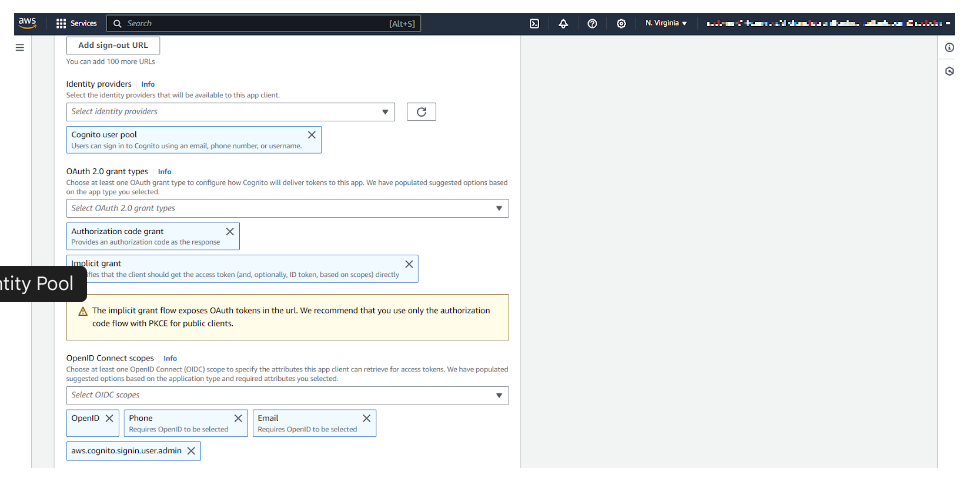
Step 4: Create a Cognito App Client
To allow applications to authenticate users, create an App Client:
- In App integration, click “Add an app client.”
- Enable OAuth 2.0 and select Authorization code grant.
- Choose allowed OAuth scopes:
- openid (User identity verification)
- email (Access to user email)
- profile (Access to user profile)
- Copy the App Client ID and Client Secret—we’ll need them in Amplify.
ii) Configuring Identity Pools for Federated Access
Cognito Identity Pools allow authenticated users to access AWS services (like S3, DynamoDB, Lambda). Let’s configure them.
Step 1: Create an Identity Pool
- Go to AWS Cognito → Click “Manage Identity Pools” → Create a new identity pool.
- Enable Authenticated & Unauthenticated identities.
- Link the User Pool ID (from the previous step).
Step 2: Assign IAM Roles for Different User Types
To control what users can do, assign IAM roles based on user type:
- Admin Users → Full access to AWS services
- Regular Users → Restricted access
- Guests → Limited public access
Example IAM Policy for authenticated users (S3 read & write access):
JSON Configuration File
| { “Version”: “2012-10-17”, “Statement”: [ { “Effect”: “Allow”, “Action”: [“s3:GetObject”, “s3:PutObject”], “Resource”: “arn:aws:s3:::my-secure-bucket/*” } ]} |
iii) Handling Token Management Securely
Step 1: Storing Tokens Securely in a React Native App
To store tokens securely in React Native/Expo, use expo-secure-store:
Install Secure Store by using this command:
| expo install expo-secure-store |
Secure the token securely by using the below config file:
| import * as SecureStore from ‘expo-secure-store’; async function saveToken(token) { await SecureStore.setItemAsync(‘userToken’, token);} async function getToken() { return await SecureStore.getItemAsync(‘userToken’);} |
Step 2: Handling Token Refresh & Expiration
When tokens expire, users need to refresh them without logging in again. Amplify handles this automatically, but you can manually refresh tokens using:
| import { Auth } from ‘aws-amplify’; async function refreshSession() { const session = await Auth.currentSession(); const newToken = session.getIdToken().getJwtToken(); return newToken;} |
Step 3: Best Practices for Secure Authentication Flows
You must:
- Never store tokens in AsyncStorage or localStorage (they are vulnerable to XSS attacks).
- Rotate OAuth secrets regularly to prevent misuse.
- Enable account lockout after multiple failed login attempts.
- Use HTTPS everywhere—never send tokens over HTTP.
Next Steps
Now that we have Cognito User Pools & Identity Pools set up, the next step is to integrate this authentication system into a React app using AWS Amplify!
Implementing Secure Authentication in a React App
Now that we’ve set up Cognito User Pools & Identity Pools, it’s time to integrate authentication into a React application using AWS Amplify. In this section, we’ll:
- Set up Amplify in a React project
- Integrate OAuth & federated authentication (Google, Facebook, Okta, Microsoft)
- Secure API requests using Cognito & IAM roles
i) Setting Up AWS Amplify in a React Project
First, let’s install and configure AWS Amplify in our React app.
Step 1: Install AWS Amplify
Run the following command in your React project directory:
| npm install aws-amplify @aws-amplify/ui-react |
Step 2: Configure Amplify with Cognito User Pools
Create an Amplify configuration file (aws-exports.js) with Cognito details.
| import Amplify from ‘aws-amplify’; Amplify.configure({ Auth: { region: “us-east-1”, // Replace with your AWS region userPoolId: “us-east-1_XXXXXXX”, userPoolWebClientId: “XXXXXXXXXXXXXXXXX”, identityPoolId: “us-east-1:XXXXXXXX-XXXX-XXXX-XXXX-XXXXXXXXX”, oauth: { domain: “your-auth-domain.auth.us-east-1.amazoncognito.com”, scope: [“email”, “profile”, “openid”], redirectSignIn: “http://localhost:3000/”, redirectSignOut: “http://localhost:3000/”, responseType: “code”, }, },}); |
“Note: Replace userPoolId, userPoolWebClientId, and identityPoolId with your actual Cognito details.”
Step 3: Initialize Amplify in Your React App
In index.js (or App.js), import and initialize Amplify:
| import React from “react”;import ReactDOM from “react-dom”;import Amplify from “aws-amplify”;import awsExports from “./aws-exports”;import App from “./App”; Amplify.configure(awsExports); ReactDOM.render(<App />, document.getElementById(“root”)); |
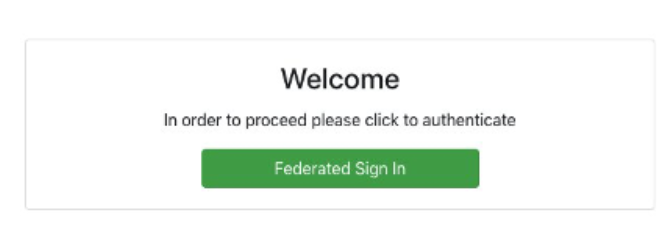
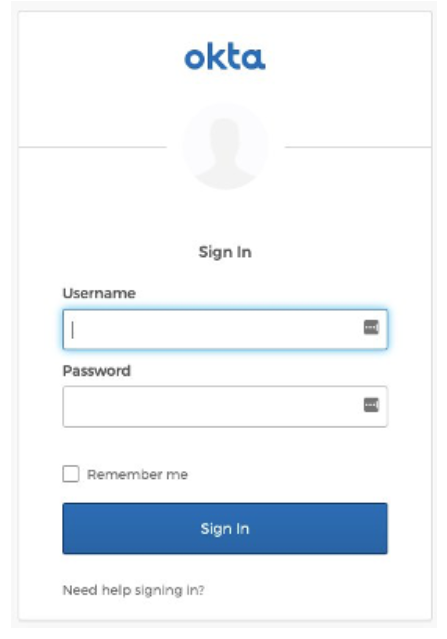
ii) Adding OAuth & Federated Authentication
Now, let’s implement a login UI that supports:
- Google, Facebook, Okta, and Microsoft OAuth
- Cognito sign-up and sign-in
Step 1: Create a Login Component
In Login.js, add the following:
| import React from “react”;import { AmplifySignOut, withAuthenticator } from “@aws-amplify/ui-react”; function Login() { return ( <div> <h2>Welcome to Secure App</h2> <AmplifySignOut /> </div> );} export default withAuthenticator(Login); |
This will:
- Automatically render the Cognito sign-in/sign-up form
- Enable federated sign-in for OAuth providers
Step 2: Customize the Sign-In UI
To allow Google, Facebook, or Okta login, modify aws-exports.js:
| oauth: { domain: “your-auth-domain.auth.us-east-1.amazoncognito.com”, scope: [“email”, “profile”, “openid”], redirectSignIn: “http://localhost:3000/”, redirectSignOut: “http://localhost:3000/”, responseType: “code”, options: { Google: true, Facebook: true, Okta: true, Microsoft: true, }}, |
iii) Securing API Requests with Cognito & IAM Roles
Once a user logs in, we need to secure API requests using Cognito tokens.
Step 1: Install GraphQL API & Amplify API Module
| npm install @aws-amplify/api |
Step 2: Configure API Authorization
Modify aws-exports.js:
| API: { endpoints: [ { name: “myAPI”, endpoint: “https://your-api-endpoint.amazonaws.com/”, region: “us-east-1”, authorizationType: “AMAZON_COGNITO_USER_POOLS”, }, ],}, |
Step 3: Make Secure API Requests
Use Cognito tokens to call a protected API endpoint.
| import API from “@aws-amplify/api”; async function fetchData() { const apiName = “myAPI”; const path = “/data”; const requestOptions = { headers: { Authorization: `Bearer ${(await Auth.currentSession()).getIdToken().getJwtToken()}` }, }; const response = await API.get(apiName, path, requestOptions); console.log(response);} |
End-Result:
Then, the user will receive the following response:
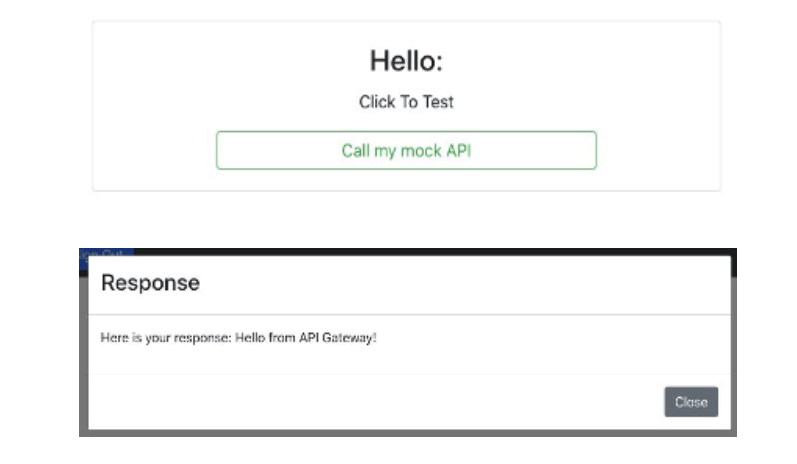
Why is this important? This ensures that only authenticated users with valid Cognito tokens can access sensitive API data.
Next Steps
Now that we have OAuth & Cognito authentication fully integrated into React, the final step is to apply security best practices to make our auth system even more secure!
Best Practices for Secure Authentication
Ensuring secure authentication is crucial to protecting against token theft, brute-force attacks, and unauthorized access. Below are key best practices for strengthening AWS Amplify authentication.
1) Secure Token Storage (React Native & Web)
Tokens grant access to APIs and user data—compromised tokens lead to security risks.
- Web Apps: Store tokens in HttpOnly cookies via a backend service. Avoid localStorage or sessionStorage (XSS risk).
- React Native: Use SecureStore (Expo) or encrypted AsyncStorage.
- Alternative: Store tokens in memory for non-persistent sessions.
2) Fine-Grained Access Control with IAM & Cognito
Ensure users only have necessary permissions using RBAC and Cognito Groups.
- Cognito Groups: Define roles like Admin, User, etc.
- IAM Policies: Attach policies restricting API access.
3) Prevent Brute Force & Account Takeover
- Enable MFA: Set as required in Cognito → MFA Settings (SMS, Email, or OTP).
- Account Lockout & Rate Limiting: Configure Cognito to limit failed login attempts & enforce strong password policies (8+ chars, special symbols, uppercase).
4) Rotate OAuth Secrets & Tokens
To prevent credential compromise:
- Use short-lived access tokens (1-hour expiration).
- Refresh tokens securely.
- Revoke compromised tokens immediately in Cognito.
5) Audit & Monitor Authentication Activity
- Enable AWS CloudTrail for sign-in tracking.
- Use Amazon GuardDuty for anomaly detection.
- Monitor failed login attempts in Cognito and set up SNS alerts for unusual activity.
Conclusion
Advanced authentication is crucial for securing cloud-based apps. By leveraging AWS Amplify, Cognito, and OAuth providers, you can build a scalable, secure authentication system while ensuring a smooth user experience.
Key Takeaways:
Here are some key takeaways:
- Use Secure Storage for tokens (HttpOnly cookies, SecureStore)
- Implement RBAC with Cognito Groups & IAM Policies
- Enforce MFA & Account Lockout to prevent brute-force attacks
- Rotate OAuth secrets & monitor authentication logs
With these best practices, your AWS Amplify authentication system will be secure, scalable, and future-proof.