Architecting a Real-Time, Serverless AI Chat Application with Amazon Bedrock

Architecting a Real-Time, Serverless AI Chat Application with Amazon Bedrock
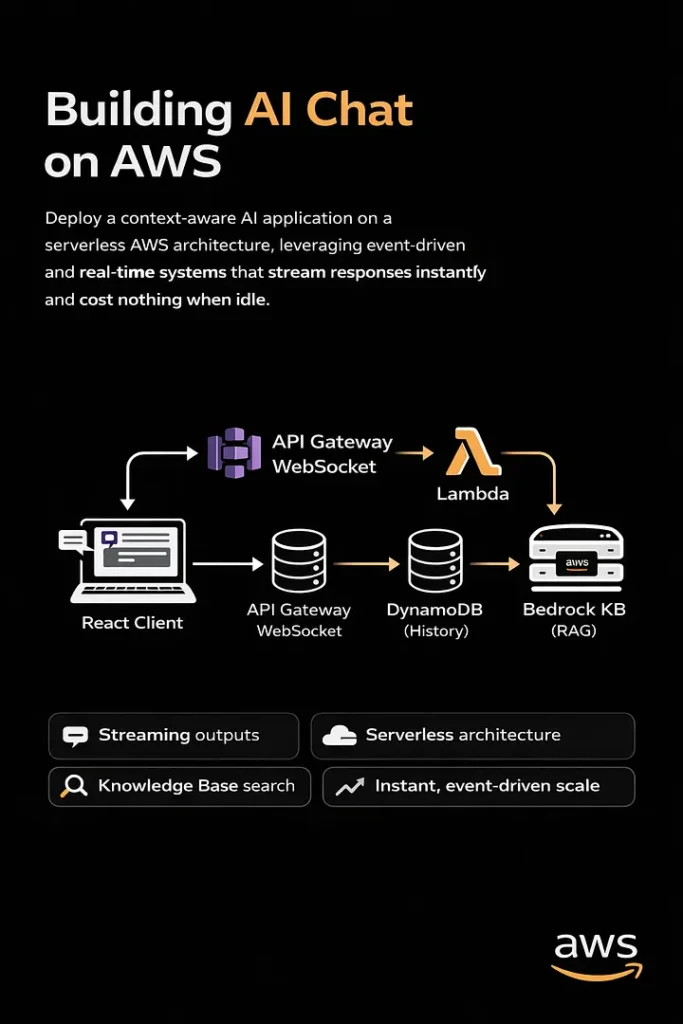
Deploy a context-aware AI application on a serverless AWS architecture, which is quick enough to serve requests in less than 10 ms, leveraging serverless event-driven and real-time systems.
Most AI chat applications today feel like a bunch of API keys coordinating together with a naive UI that too made from LLM. You type some prompt, hit the send button, it thinks for 10 seconds, and then you receive a wall of text. Today I am going to fix it.
This article is a comprehensive guide to building real-time, context-aware, 100% serverless applications that stream tokens, can look up knowledge bases, and cost nothing when idle.
More than just a text box
When I state that most AI chatbots are merely AI wrappers with hardware components operating continuously, I am implying that they lack significant optimization.
A long loading spinner that spins for up to 30 seconds displays garbage text, which users do not engage with, causing them to disengage.
I set three rigid requirements before even initializing the project.
1. Streaming Server:
Open a WebSocket connection. The interface should feel alive, not frozen.
2. Tools:
Let it search through docs, fetch time, and look up resources so that it will be able to return real answers that matter.
3. Serverless:
If no one is using it, it will cost nothing.
These three principles are the basics of building a next-gen AI chat application that actually solves a problem.
Choosing the right tech:
Why Amazon Bedrock?
Obviously, I don’t want the headache of managing rate limits, GPU clusters, and built-in knowledge bases for RAG, and the only alternative to OpenAI’s API is Amazon Bedrock.
Another reason was that I have to stick within the AWS ecosystem for IAM integration, VPC security, and consolidated billing.
Why API gateway websocket?
I want the lambda to be completely ephemeral; it should fire an event, process a message, stream a token back, and shut down. Parallelly, the WebSocket API handles the request, which Lambda doesn’t have to. Why AWS CDK?
I am building a product in a highly competitive niche, already have a ton of issues to deal with, and can’t define the entire stack on my own. The best way to go is to use cdk deploy for initialization of entire ecosystem form dynamoDB tables, Lambda functions, API Gateway routes and to IAM roles.
Infrastructure as Code is non-negotiable for any production system.
Architecture deep dive (How it works?)
High-level view:
The system operates on an event-driven basis, managing chat sessions and delegating the complex tasks of state management and LLM orchestration to managed serverless AWS services.
A. The Connection Layer: API Gateway + WebSocket
A regular REST API won’t work here. LLMs are not fast. A sophisticated query can take 20 to 30 seconds from start to finish, yet a normal HTTP request would run out much before that.
API Gateway’s WebSocket API solves this cleanly: API gateway maintains a powerful persistent TCP connection to our lambda. It exposes three important routes on our behalf.
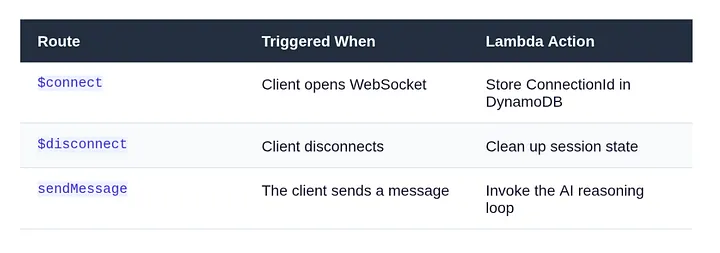
The ConnectionId is the most important piece of information. The ConnectionId is the permanent handle to the browser session, while Lambda is temporary. Lambda gets it from the event context and uses it to send tokens back through the API Gateway management endpoint for the whole stream.
By default, Lambda functions are ephemeral; it’s the connection ID that handles persistent connections to the browser session.
Lambda reads it from the event context and pushes back tokens through the API gateway management endpoint.
B. The Backend Brain: Lambda + Bedrock
The Entry Point
As said earlier, every inbound message reaches the Lambda handler. The first thing lambda does is extracting who sent it, and what they said.
export const handler = async (event: APIGatewayProxyWebsocketEventV2) => {
  const { connectionId, routeKey } = event.requestContext;

  if (routeKey === 'sendMessage') {
    const { message, sessionId } = JSON.parse(event.body ?? '{}');

    await processCopilotMessage({ connectionId, message, sessionId });
  }

  return { statusCode: 200 };
};
The Reasoning Loop
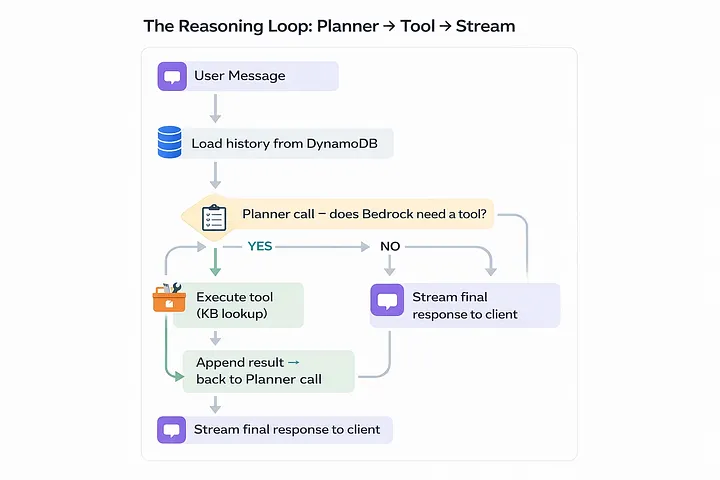
This is the very core of our application; instead of directly sending user’s message to Bedrock for final response, run it through a loop.
First, call the planner, which decides whether a tool is needed; if it says yes, execute it and feed the result into the event.
The second call is to the streamer to generate the final token-by-token response.
Planner call to tools
const plannerCall = async (messages: Message[]) => {
  const response = await bedrock.send(new ConverseCommand({
    modelId: 'anthropic.claude-3-5-sonnet-20241022-v2:0',
    system: [{ text: SYSTEM_PROMPT }],
    messages,
    toolConfig: {
      tools: [KB_LOOKUP_TOOL_SPEC],    // JSON schema for kb_lookup
      toolChoice: { auto: {} },
    },
  }));

  return response.output?.message;
};
Final Streaming to user
const finalStream = async (messages: Message[], connectionId: string) => {
  const stream = await bedrock.send(new ConverseStreamCommand({
    modelId: 'anthropic.claude-3-5-sonnet-20241022-v2:0',
    system: [{ text: SYSTEM_PROMPT }],
    messages,
  }));

  for await (const chunk of stream.stream) {
    if (chunk.contentBlockDelta?.delta?.text) {
      await pushToClient(connectionId, {
        type: 'token',
        value: chunk.contentBlockDelta.delta.text,
      });
    }
  }

  // Signal stream complete
  await pushToClient(connectionId, { type: 'done' });
};
The Tool: Knowledge Base Lookup
A half-baked copilot is one that can only talk. I used the kb_lookup tool with Bedrock after defining it in the JSON schema. The planner returns a tool_use block when it determines that it needs documentation context, and Lambda manages the actual retrieval:
const KB_LOOKUP_TOOL_SPEC = {
  toolSpec: {
    name: 'kb_lookup',
    description: 'Search internal documentation for relevant context.',
    inputSchema: {
      json: {
        type: 'object',
        properties: {
          query: { type: 'string', description: 'The search query.' },
        },
        required: ['query'],
      },
    },
  },
};

// When Bedrock returns tool_use with name 'kb_lookup':
const results = await bedrockAgent.send(new RetrieveCommand({
  knowledgeBaseId: process.env.KB_ID,
  retrievalQuery: { text: toolInput.query },
}));
C. State & Persistence: DynamoDB
By default LLMs are stateless; they don’t store anything. They should have a context what are we talking about, some sort of history, your name, your task and definately what is your goal.
DynamoDB is our go-to solution to this challenge; it’s fast, serverless, and integrated with the AWS ecosystem.
System Design
The lifecycle of our app is
Load → Append → Process → Save → Stream
It fetches the existing messages array, pushes the new user message, sends the full array to Bedrock, appends the assistant’s reply, and writes it all back.
PK prevents entity type key conflicts with SESSION#.
SK is always STATE one item per session, one read/write every turn.
Bedrock receives the whole chat array on every request, capped at 20 messages via a sliding window.
TTL automatically expires sessions after 24 hours, requiring no cleaning.
const loadAndSave = async (sessionId: string, newMsg: Message) => {
  // 1. Load
  const record = await dynamo.send(new GetItemCommand({
    TableName: TABLE_NAME,
    Key: { PK: { S: `SESSION#${sessionId}` }, SK: { S: 'STATE' } },
  }));

  const messages: Message[] = record.Item
    ? JSON.parse(record.Item.messages.S ?? '[]')
    : [];

  // 2. Append new user message
  messages.push(newMsg);

  // 3. (Call Bedrock — see previous section)

  // 4. Save updated history (enforce sliding window)
  const window = messages.slice(-20); // last 20 messages max
  await dynamo.send(new PutItemCommand({
    TableName: TABLE_NAME,
    Item: {
      PK: { S: `SESSION#${sessionId}` },
      SK: { S: 'STATE' },
      messages: { S: JSON.stringify(window) },
      ttl: { N: String(Math.floor(Date.now() / 1000) + 86400) },
    },
  }));
};
D. The React Frontend
WebSocket lifecycle management can get messy due to stale closures, reconnect logic, and cleanup on unmount. Therefore, I encapsulated all of it in a single custom hook:
export function useAIsocket(url: string) {
  const [messages, setMessages] = useState<ChatMessage[]>([]);
  const wsRef = useRef<WebSocket | null>(null);

  useEffect(() => {
    const connect = () => {
      const ws = new WebSocket(url);
      wsRef.current = ws;

      ws.onmessage = (event) => {
        const data = JSON.parse(event.data);

        if (data.type === 'token') {
          // Append token to last assistant message
          setMessages(prev => {
            const updated = [...prev];
            updated[updated.length - 1].content += data.value;
            return updated;
          });
        }

        if (data.type === 'done') {
          setMessages(prev =>
            prev.map((m, i) =>
              i === prev.length - 1 ? { ...m, streaming: false } : m
            )
          );
        }
      };

      // Auto-reconnect on drop
      ws.onclose = () => setTimeout(connect, 2000);
    };

    connect();
    return () => wsRef.current?.close();
  }, [url]);

  const sendMessage = (text: string) => {
    // Optimistic UI: show user message immediately
    setMessages(prev => [
      ...prev,
      { role: 'user', content: text },
      { role: 'assistant', content: '', streaming: true },
    ]);

    wsRef.current?.send(JSON.stringify({ message: text }));
  };

  return { messages, sendMessage };
}
Streaming Tokens in the UI
Websocket streaming is where backend and react comes in contact with each other, the backend sends a series of small JSON payloads. In react I concatenate them to the content string; react reconciler does the rest, re-rendering effectively and producing a typing animation without any third-party library.
An important UX tip is to hide the latency gap when a user sends a message and it reaches the Lambda; adding a typing indicator is a good change to do. This lets the user stick to the platform without being idle for a period of time.
E. Infrastructure as Code: AWS CDK
Opening the AWS console and setting up Lambda, Bedrock, API Gateway, DynamoDB, and IAM roles is a recipe for clustered workflow and pain.
CDK collapses everything into a single TypeScript file that is version controlled, reproducible, and deployable with a single command.
const table = new dynamodb.Table(this, 'Sessions', {
  partitionKey: { name: 'PK', type: dynamodb.AttributeType.STRING },
  sortKey:      { name: 'SK', type: dynamodb.AttributeType.STRING },
  timeToLiveAttribute: 'ttl',          // auto-expire sessions
  billingMode: dynamodb.BillingMode.PAY_PER_REQUEST,
});

const fn = new lambda.NodejsFunction(this, 'CopilotHandler', {
  entry: 'src/handler.ts',
  runtime: lambda.Runtime.NODEJS_20_X,
  timeout: cdk.Duration.seconds(28),   // just under GW 29s limit
  environment: {
    TABLE_NAME: table.tableName,
    KB_ID:      'your-knowledge-base-id',
  },
});

// Scoped permissions — principle of least privilege
table.grantReadWriteData(fn);
fn.addToRolePolicy(new iam.PolicyStatement({
  actions:   ['bedrock:InvokeModel', 'bedrock:InvokeModelWithResponseStream'],
  resources: [`arn:aws:bedrock:*::foundation-model/anthropic.claude-3-5-*`],
}));
Please take note of the IAM policy that is scoped. The Lambda can only use the Bedrock model family it requires, not all the resources in our account.
F. Checking Deployment on AWS Console
DynamoDB:
Navigate to DynamoDB → Tables and examine the SessionsTable. Press the Items button. Open our chat app and send a message now. When we refresh the table view, a new item will show up with the SESSION#<uuid> partition key.

Send another message and then refresh
That item’s messages array gets bigger. This signifies that the history of the conversation is being saved correctly between turns.
If this isn’t there, it signifies that the Lambda isn’t sending anything to DynamoDB. Check out for IAM. The grantReadWriteData grant in CDK should have taken care of this, but if you did it yourself, make sure the policy is attached.
API Gateway:
OpenAPI Gateway →APIs, then pick CopilotWsApi. Click on Routes on the left side. You should see three routes: $connect, $disconnect, and sendMessage.

Every route should strictly point to your Lambda function as the integration target. If sendMessage is missing or points to the wrong Lambda, messages will not go through, and we won’t get any warning. The WebSocket connection will open, but when we type, nothing will happen.
Stages can also give you the WebSocket URL
This is what it looks like: wss://xxxxxxxxxx.execute-api.us-east-1.amazonaws.com/prod. You may check the connection layer without the front end, just copy and paste this into a WebSocket testing tool like wscat.
CloudWatch Logs:
This is the section of the stack that sticks out the most. Click on Log Groups in CloudWatch. Next, go to /aws/lambda/ChatFn. Check the most recent log stream for the planner output. We will notice a log entry like this if Bedrock decides to use the Knowledge Base feature:

{
  "role": "assistant",
  "content": [
    {
      "toolUse": {
        "name": "kb_lookup",
        "input": { "query": "deployment guide" }
      }
    }
  ]
}
Bedrock thinks like this: the model isn’t just guessing; it’s choosing to search things up before it gives an answer. CloudWatch says that the planner loop is working well. If we only see plain text content blocks and never a toolUse block, either our tool spec isn’t set up right or the system prompt isn’t instructing the model to use tools.
We can use the string toolUse to build up a CloudWatch Metric Filter to check how often the model uses tools in all sessions. This is useful for learning how people use our knowledge base and making its content better over time.
Lambda:
After that, navigate to Functions and then select ChatFn. Click on the tab that says “Monitor.” We should keep a watch on these two numbers:
The Init Duration is the time it takes to start from scratch, which is the one-time cost of putting up a new Lambda execution environment. It should take 400 to 800 milliseconds for a Node.js TypeScript function to start up with the Bedrock and DynamoDB SDKs. After that, the next calls in the same environment are warm and only need a few extra milliseconds before the first token streams.
Duration: This is the amount of time it takes for each invocation of Lambda to run. If we just want to converse, we should wait 2 to 5 seconds, most of which is Bedrock creating tokens. Add 1 to 3 seconds to the retrieval phase if a turn includes a Knowledge Base lookup. If we continually hitting the 28-second restriction, something is wrong. The planner is either repeating itself or the Knowledge Base query is stalled.

G. Challenges ahead
There are always problems when building a production system. These are the three that took me the most time:
29-second break
API Gateway WebSockets have a strict 29-second integration timeout. Set the timeout for your Lambda to 28 seconds, and make sure that ConverseStreamCommand starts sending tokens right away, keeping the connection open during the response.
Gap in tool latency
When the planner decides to contact a tool, the client doesn’t get anything for 3 to 5 seconds while the Knowledge Base lookup executes. Send a status message right away:
{ type: “status”, value: “Searching knowledge base…” }
Without it, the UI looks like it’s frozen, and users think something is wrong.
JSON parsing crashes
WebSocket messages are just plain text. Always utilize defensive parsing with a backup plan: JSON.parse(event.body ?? ‘{}’). Before you trust any field, be sure the shape is correct. Your Lambda should never crash because of a single bad message.
Disconnects in middle of stream
When a user closes the tab in the middle of a stream, API Gateway sends a GoneException on the next PostToConnection operation. If you catch it in your push helper, break out of the streaming loop right away. If you don’t, Lambda will keep running and charging you for a dead connection
Cost of context window
If you submit the entire history on each round, the token cost increases linearly with the duration of the session. The loadAndSave method above has a 20-message sliding window that keeps this from getting too big. For really long sessions, the next step is to include a background summary process that combines old history into one system message.

Warning
Sending Bedrock the whole conversation history with every message means that the cost of tokens goes up as the session goes on. Use the sliding window method in production and optimize it for the cumulative chats.
H. Future Roadmap
If the foundation is built solidly, we can easily stack scalability on top of it.

Here’s where to take it next:
Cognito Auth
Put Cognito User Pools inside the WebSocket authorizer. Before Lambda is called, each connection is checked.
Advanced RAG
Instead of Bedrock Knowledge Bases, use a hybrid search strategy with dense vectors (OpenSearch kNN) and BM25 lexical search to get more results.
Human-in-the-Loop
Use Amazon Connect or a custom ticketing system to find low-confidence responses and send them to a queue for human agents
Multi-Region
Each region utilizes a combination of DynamoDB Global Tables and Lambda. The stateless Lambda design makes this straightforward; the session state lives in DynamoDB.
Agent Memory
Persist key user facts across sessions in DynamoDB not just the rolling conversation window. Personalization without fine-tuning.
Usage Analytics
Stream CloudWatch metrics into a dashboard: tool invocation rate, avg session length, cold start frequency, cost per session.
Conclusion
Serverless AI is production-ready: Bedrock’s controlled model access, API Gateway WebSockets for real-time push, Lambda for ephemeral compute, and DynamoDB for stateful memory create a production-grade system without a server.
I can state that the end result is not just a chatbot after constructing it. It’s a built-in, smart interface that feels like it’s been waiting for a long time.


Thanks. This was helpful.